


WHat are my options, here
This discussion is connected to the gimp-user-list.gnome.org mailing list which is provided by the GIMP developers and not related to gimpusers.com.
This is a read-only list on gimpusers.com so this discussion thread is read-only, too.
| WHat are my options, here | Noel Stoutenburg | 21 Sep 10:56 |
| WHat are my options, here | David Gowers | 21 Sep 15:49 |
| WHat are my options, here | Marc Carson | 21 Sep 16:52 |
| WHat are my options, here | Akkana Peck | 21 Sep 18:59 |
WHat are my options, here
Friends,
I'm trying to figure the best way to use GIMP blend colors in a particular application.
I have a topographical map, and I want to apply a color gradient which follows the contour lines of the map, and blends from a darker hue at the lower contour to a lighter hue at the next higher contour. The contour lines are not parallel. In the final image, I want a uniform darker hue right next to the contour line, and a uniform ligher hue at the higher one. A further complication is that the contours do not have a uniform direction. In one part of the image the gradient from 10 units to 20 units will be right to left, in another part of the image going from 10 units to 20 will go from left to right, and in still others, the contour representing 20 units will be a smaller irregular shape inside the larger, different, but still irregular shape representing an elevation of 10 units.
I've thought of a number of ways to do this manually, for example, divide the map into different layers at the contour lines, and using the airbrush tool to overlay the colors; another is to leave the different contour levels in one layer, and use the smudge tool to blend across the contours. But are there filters of plug-ins which might automate at least part of the process?
ns
WHat are my options, here
On Mon, Sep 21, 2009 at 6:26 PM, Noel Stoutenburg wrote:
Friends,
I'm trying to figure the best way to use GIMP blend colors in a particular application.
I have a topographical map, and I want to apply a color gradient which follows the contour lines of the map, and blends from a darker hue at
BTW: I don't know what 'a color gradient that follows the contour
lines' means, I could only guess.
If my advice is not suitable for what you mean, I suggest clarifying.
the lower contour to a lighter hue at the next higher contour. The contour lines are not parallel. In the final image, I want a uniform darker hue right next to the contour line, and a uniform ligher hue at the higher one. A further complication is that the contours do not have a uniform direction. In one part of the image the gradient from 10 units to 20 units will be right to left, in another part of the image going from 10 units to 20 will go from left to right, and in still others, the contour representing 20 units will be a smaller irregular shape inside the larger, different, but still irregular shape representing an elevation of 10 units.
I've thought of a number of ways to do this manually, for example, divide the map into different layers at the contour lines, and using the airbrush tool to overlay the colors; another is to leave the different contour levels in one layer, and use the smudge tool to blend across the contours. But are there filters of plug-ins which might automate at least part of the process?
The built in edge detection filters may help you in creating a suitable selection to apply darkening to.
For the basic colorizing , I think you want the Gradient Map filter (Colors->Map->Gradient Map)
Hope that helps
WHat are my options, here
That is a tough one. I've done this sort of thing before, but in 3D software, and I already had a displacement (black to white) map to use for extruding the 3D surface. I then used a procedural texture color gradient on the Y axis of the model to apply my chosen colors to the model's contours, which could be controlled by editing the spacing of colors within the gradient texture itself. The final step was to render the image from the top view in a parallel camera mode, producing a flat 2D image with no perspective distortion. This could then be composited with the original topo map.
I don't see any easy way to automate part of this in GIMP, other than perhaps using a blur filter to help with the blending between contours (doubtful if that will even give great results). It's also hard to try without seeing an example map, because some topo maps are a pain this way - they often have things like numbers overlaid on the lines, which creates many little gaps that must be compensated for when selecting a specific area.
Hope you find a way.
Marc
WHat are my options, here
Noel Stoutenburg writes:
I have a topographical map, and I want to apply a color gradient which follows the contour lines of the map, and blends from a darker hue at the lower contour to a lighter hue at the next higher contour. The
Have you used Shaped gradients? I think they'll help a lot.
If you haven't used them, try selecting one contour area, then use the Gradient tool with Shape=Shaped, and drag from one edge of the contour to the other. Neat, huh? But it's not quite what you want, because it goes from white to black to white again, not from white at one contour to black at the next.
Here's a way I found to do that. It may still take a lot of steps, but I think you'll get a better result than the smudging/airbrushing method you mentioned:
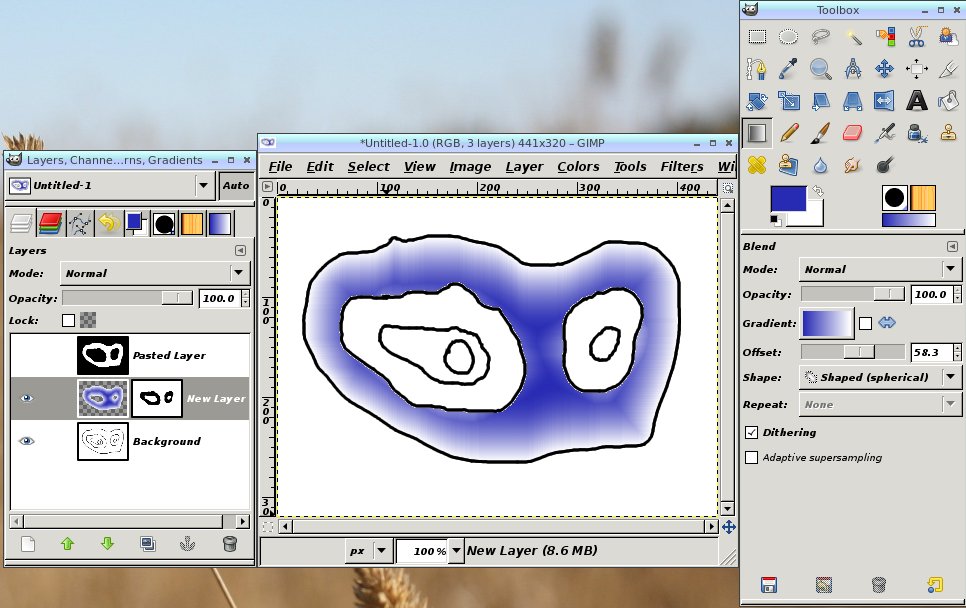
Start with an image that has just the contour lines -- e.g. black contour lines on a white background.
Use the magic wand tool and select the area within one contour (the white area between two sets of black contour lines).
Save this selection somehow (e.g. switch to Quickmask mode, Copy, then Paste and make it a new layer and turn visibility off on that layer; or save it as a channel in the Channels dialog).
Still in magic wand, switch to Add mode and add the area in the next contour up. (Or down, your choice.)
You may also need to select the line between the contours. If it's antialiased, it may be faster to use quickmask and the paintbrush rather than magic wand here. Or you may not need to select it at all.
Make a new layer (where you'll be drawing the gradient).
On the new layer, make a layer mask. Copy that original selection you made, of a single contour area, and paste it into the mask. Then click on the layer preview. Now you'll be drawing into the new layer, but you'll only see the part corresponding to the current contour.
In the Gradient tool with Shape=Shaped, drag across your contour to make the shaped gradient.
I ended up with something like this: http://gimpbook.com/tmp/contours.jpg You can clean up the edges of the layer mask as needed (those white edges between the blue edge and the black contour line). The important thing is that the shaped gradient gives you a nice fade in the right directions without your needing to airbrush anything.
...Akkana "Beginning GIMP: From Novice to Professional": http://gimpbook.com


