Tutorial: GIMP 2.9/2.10 Feature Preview
-
1
A huge step for GIMP: 16/32 bit per channel support
From now on, you’ll be able to work with a lot more color information and detail in your pictures. This support basically gives you the ability to create super-smooth color transitions on your picture. And theoretically, from now on it’s possible to have RAW files edited with GIMP directly since there is enough color space to bring back all the details that are stored inside a RAW file – however this is not yet implemented yet.
This feature was already shown in May 2012 on Libre Graphics Meeting in Vienna, right after the release of GIMP 2.8. There has been much work done since then below the surface. GIMP 2.10 will be able to work with:
- 16 bits per color channel – fixed integer
- 16 bpcc – floating point
- 32 bpcc – fixed integer
- 32 bpcc – floating point and of course
- 8 bpcc integer
If you wonder what the difference is between integer and floating point (in the graphics area): If you have an image with 16-bit integer precision per channel, then you have 65.536 shades of different red, green and blue color tones – all of them equally stepped to each other (equal color distance). If you have it in floating point, then there are no equal-wide steps – so you can distribute the possible color values over selected ranges. For example: if you know that you have a very dark image with many shades of dark red color tones then you would benefit from floating point because you can decrease the importance of the brighter color tones and get most color detail out of only the darker reds.
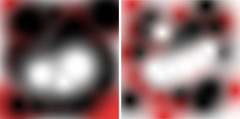
Image description: left 8bpcc – you can see the lack of available colors clearly between the transitions of the colors; not so in the 32bpcc image on the right.
-
2
(Almost) Lossless color space conversions
You can convert images into different color spaces on-the-fly forth and back as you wish with no or almost no loss of information.
-
3
New tool: Unified transformation
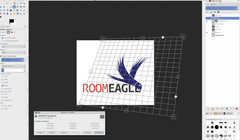
If you click a layer with this new tool, you’ll not only be able to scale a layer but you’ll have the ability to rotate, shear and perspective transform it all at once in one single operation.
This was implemented during a Google summer of code 2012 project. The result will be in GIMP 2.10 and combines all of the transformation tools into one. Awesome and very time saving!
-
4

Heavily improved scaling quality: No- and LoHalo-Samplers
Previously GIMPs results when scaling images down (= reducing width/height) were good but not perfect, i.e. you may have noticed some blurryness or too jaggy results (especially on text or diagonal lines). This will be history with the new sampling methods. They produce super sharp results that aim to be a real 1:1 copy of your original image (but only smaller).
In this crowd-funded project (that is not finished yet, so you can still speed things up with a donation – see here), the aim was to get high-quality scaling into GIMP with new GEGL samplers named NoHalo and LoHalo. These new sampling methods are available where scaling is applied to a layer or image (transformation tools, Image→Scale Image, etc).
Basically all of the new samplers are producing clearly visible better outputs (especially when rotating or downscaling) than all of the older methods currently in GIMP.
But there are some things you should keep in mind: Use the
- LoHalo method: when you downscale an image thats less than a half of the original size
- NoHalo method when you do not reduce the size much (rotate, shear or something)
- LoBlur method (yet to come) will produce very sharp outcome
- LoJaggy (yet to come) is a special method and aimed on reducing jaggyness
This is a quote of Nicolas Robidoux, the creator of the new quality samplers for GEGL and GIMP:
“If haloing is not an issue with your content and use case, which of the two should you try first? (Clearly, if you want to minimize haloing, NoHalo is the ticket.)
If you are reducing an image, LoHalo is generally better.
If your transformation is not an all around reduction, for example if you enlarge, rotate or apply a perspective transformation that keeps portions of the image at the same or higher resolution, I generally prefer NoHalo. This preference, however, changes depending on the image content. If, for example, the image contains text or text-like objects or has significant areas with only a handful of different colours, like old school pixel art, I’d switch to LoHalo. Likewise if the image is quite noisy or marred by compression artifacts (as are most JPEGs found on the web). Conversely, if the image is noise free, very slightly blurry (meaning that when pixel peeking, the lines and interfaces are smeared over two or more pixels), and there are delicate skin tones to be preserved, I’d try NoHalo first. Actually, if I find that colours have not been preserved nicely after transforming an image with LoHalo, I’d immediately switch to NoHalo, even if reducing.
In any case, these recommendations should not be taken as gospel. I still have much to learn and figure out. For example, how best to deal with transparency and different colour spaces is something I’m likely to be thinking about for a while."
-
5
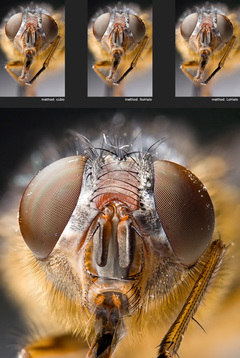
Sampling example 2:
Here you can clearly see the high quality of the new samplers.
top left: you can see the not very nice moire effect on the “eyes”
top mid: scaled with NoHalo to about 1/4th. Still very sharp, and you can see the moire effect on the eyes very slighty
top right: used LoHalo which produces smoother outcome and minimzes the moire but is a little less sharp then NoHaloThanks to Nicolas Robidoux for pointing me to this great example image!
-
6
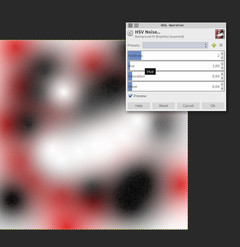
More on-canvas previews
With GEGL coming more and more into GIMP, all of the old filters need to be replaced/rewritten completely. It’s a huge effort to do this, but the benefits will include partial live-editing (where possible) so you can see the results directly on-canvas (motion blur, sharpening, pixelize, etc). This feature will make use of the new multi-core and GPU side processing as well.
Gaussian and Motion Blur work on-canvas and also most of the Noise creation filters, so you can immedialtely see what the outcome will be. I have used the HSV noise on the image.
-
7
Multi-core CPU / GPU support
GIMP 2.8 does not support multi-processed computation of filters. This will change with GIMP 2.10. Some filters will gain a great speed increase from the hardware acceleration. However only very few filters have been rewritten to make use of the OpenCL acceleration feature yet (see next step).
/OpenCL is currently disabled by default. If you want to see it in action, use the “GEGL_USE_OPENCL=yes” parameter when starting GIMP from the terminal. It’s the goal of the developers to have the whole projection (= what you see on the canvas) hardware-accelerated too. But for now things are still slow and not accelerated except a few filters. /
-
8
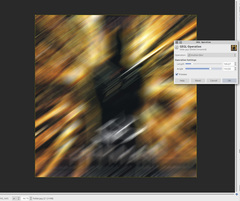
OpenCL-accelerated filters
These filters do currently make use of the full power of your CPU/GPU hardware which results in accelerated computation:
Gaussian Blur, Grey, Laplace, Motion Blur, Pixelize, Sobel, Threshold
Note that for GIMP 2.10, not all filters need to be accelerated. For some of them, it’s not important and sometimes there is just no gain in speed of the computation.
In the example image I have used the on-canvas motion blur on a 1400×1400 picture with different values; every time when doing a change it was rendered directly on the image in less than a second! Awesome speed compared to the old behaviour in GIMP 2.8 where the same operation took about 10 or more seconds to be computed and rendered.
-
9
GEGL based filters and plugins
These filters have already been rewritten to make use of GIMPs new graphics engine (GEGL) which results in support for all of the high bit depths features and possible acceleration via OpenCL:
Cartoon, Checkerboard, Color to Alpha, Convolution Matrix, Cubism, Deinterlace, Difference of Gaussian, Emboss, Fractal Explorer, Fractal Trace, Gaussian Blur, Grey, Grid, HSV Noise, Laplace, Lens Distortion, Motion Blur, Noise Spread, Oilify, Photocopy, Pixelize, Plasma, Polar coordinates, Red eye removal, RGB noise, Ripple, Rotate Colors, Shift, Sobel, Softglow, Spread, Threshold, Unsharp Mask, Waves, Whirl and Pinch, Wind.
-
10
ICC v4 color profile conversion support
LittleCMS 2 has been implemented into GIMP which makes it possible to convert forth and back between different color profiles with almost no loss of information.
-
11
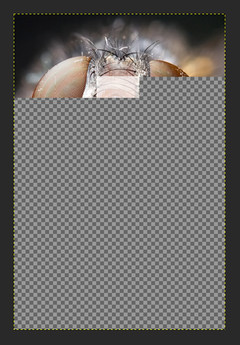
Tile based computation and projection
This is not really a new feature but when the switch to GIMPs new engine is completed, every operation should work tile-based (using new GEGL tiles) – the base for better improvements in the future. The image shows how tiles are computed and rendered – every rectangle is a part of the image that can be processed seperately. Currently the redrawing of GIMPs canvas area is very slow because accelerated projection is not the goal in the current phase of development.
-
12
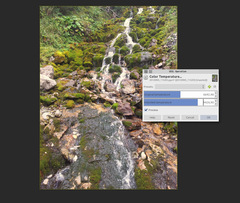
Color temperature correction
There is a new filter in the Colors menu that lets you correct the color temperature of your photos. You can shift the white point to make your photos warmer or colder or adjust the correct white point in Kelvin.
-
13
Say goodbye to:
- the Lanczos 3 sampler (replaced by the new LoBlur samling method)
- Maximum RGB filter
These filters have been removed since there were either replacements or had no proper use to the GIMP users.
-
14

GIMP 2.10 could be released in late 2013. This is a vague estimation – there is no official release date yet.


Comments
Post your own comments, questions or hints here. The author and other users will see your posting and can reply to it.
Of course, you can also ask in the chat.
Subscription management
Please log in to manage your subscriptions.
User rating
This topic (GIMP 2.9/2.10 Feature Preview) has been rated 5.0/5.0.
New comments are disabled because of spam.