RSS/Atom feed Twitter
Site is read-only, email is disabled

Tutorial: Create a shocking sphere/ball

Written by · Created on Aug 11, 2007, last updated almost 14 years ago CC BY-NC License
Create a shocking sphere/ball

Motivation

In this tutorial our user MaleXx wll show you how you can create a shocking sphere by combining some tutorials of gimpusers.de to a new one. Have fun!

Tutorial details

  1. 1

    First we are making the shock ball. For that we create a new file with the size 500×500px.

  2. 2

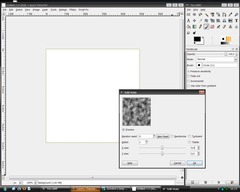
    Filters>Render>Clouds>solid noise, use parameters from picture

  3. 3

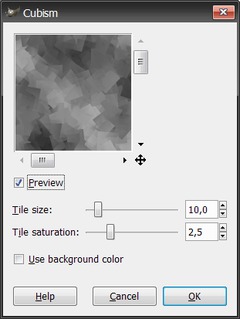
    Filters>Artistic>Cubism, use parameters from picture and then Filters>Edge-Detect>Edge with standard parameter

  4. 4

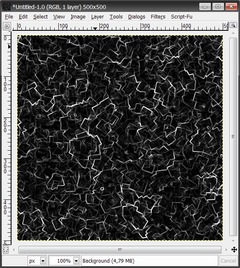
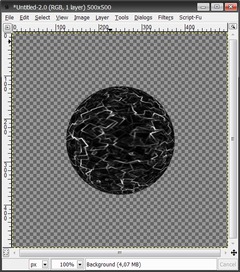
    Now your picture should look like this:

  5. 5

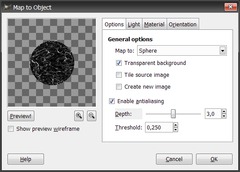
    Filters>Map>Map Object, use parameters from picture, select by Lightsource type “no light”

  6. 6

    Now your picture should look like this:

  7. 7

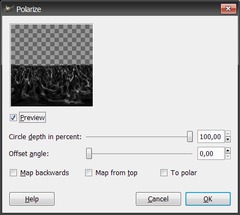
    Filters>Distorts>Polar Coords, use parameters from picture

  8. 8

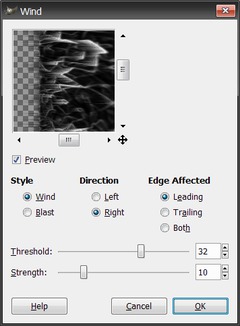
    Image> Transform>Rotate 90 degrees CCW, then Filters>Distorts>Wind, use parameters from picture

  9. 9

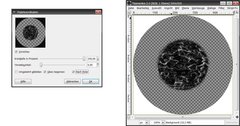
    Then repeat with Ctrl+F. Image>Transform>Rotate 90 degrees CCW, then Filters>Distorts>Polar Coords, use parameters from picture (look at the left picture)

    Now your picture should look like this:(look at the right picture)

  10. 10

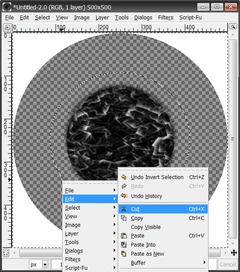
    Now there is a white border round the image. Select therefore the ball with the selection tool and click on Select>Invert

  11. 11

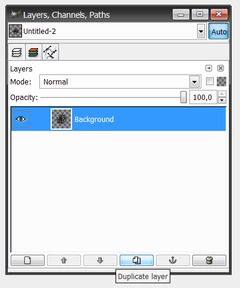
    After you cut out the white border, duplicate the layer with the ball and adjust the upper layer on “screen” mode.

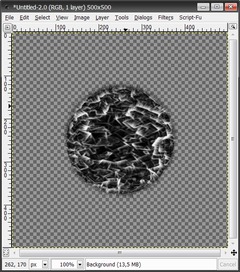
    Now the white parts in the picture are brighter.

  12. 12

    Your picture should look like this now:

  13. 13

    Right click the Layers dialog: “Merge down”.

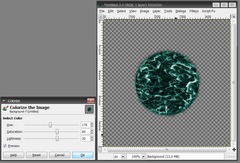
    Here the picture can be colored. For that click on Layer>Colors>Colorize and create the color you like.

  14. 14

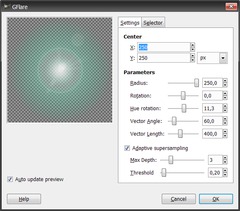
    Create the „atmosphere“. Built a transparent layer und put it in the background. Click on >Filters>Light Effects>GFlare and take the parameter out of the next image.

    The color doesn´t matter. Repeat effect with Ctrl+F. Create a second layer the same way and click again on Filters>Light Effects>GFlare, with the same parameters. This layer needs to b e shift one level before the planet layer.

  15. 15

    Now create a black layer und put it in the background.

  16. 16

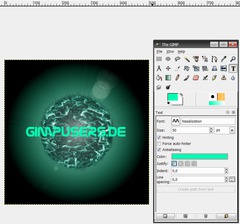
    The ball is complete now. Add a name. Use the Text Tool and write a short name with a font with less details.

  17. 17

    The color should be the same as used on the planet.
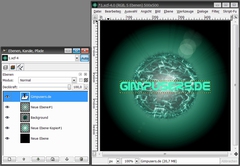
    Your image and the layer now should look like this:

  18. 18

    Create a new transparent layer and scroll it under the text layer.
    Go to the layer toolbox and select the “text layer”. Then click with the right mouse-button on it and choose “Merge down“
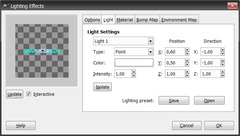
    Go to Filters>Light-Effects>Lighting Effects and put the blue point into the middle of your text, that the light flashes text in the middle. After that, choose OK.

  19. 19

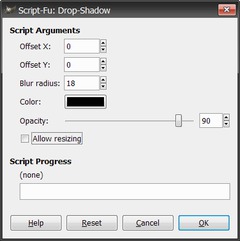
    Now click on Script-Fu>Shadow>Drop-Shadow and use the parameters of the next image.

  20. 20

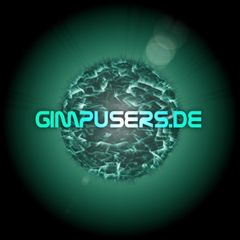
    Done. The final picture should look like this:

Comments

Post your own comments, questions or hints here. The author and other users will see your posting and can reply to it.

Of course, you can also ask in the chat.

Subscription management

Please log in to manage your subscriptions.

New comments are disabled because of spam.

AD
almost 13 years ago

Very nice tutorial

bananalover
over 14 years ago

really cool :) to make the background glow change colour; select the appropriate layer(s) and choose colours>colour balance. i also decorated mine with the sparks brush... love these tutorials

payday loans
almost 15 years ago

I am bare impressed with the article I have just read. I wish the author of www.gimpusers.com can continue to provide so much practical information and unforgettable experience to www.gimpusers.com readers. There is not much to state except the following universal truth: Everything you see, you either have seen or never seen before. I will be back.

devvv member for about 18 years devvv 1475 comments
about 15 years ago

corrected, thanks. that was an artifact of the translation from german!

Bild means "Image".

PierreLeo
about 15 years ago

In step 7: "Bild> Transform>Rotate 90 degrees CCW" "Bild" what is this? im stuck...plz help

Ottotiel
over 15 years ago

Awesome! Very well done tutorial, thanks.

Harari
over 15 years ago

This tutorial was the thing i need for my collection here is my result>

http://img179.imageshack.us/img179/1494/harariplanet.th.jpg

ShockwaveLover member for almost 16 years ShockwaveLover 7 comments
over 15 years ago

These tutorials are great. Very well done.

Danny
over 15 years ago

@Ice: Read step 13 again, I'm pretty sure it explains how to make it another colour... *cough* Colourize...

Nimmy
over 15 years ago

My creation: http://i173.photobucket.com/albums/w62/NexusKnight/GIMP%20Work/planetdoom.gif

Ozzy8
almost 16 years ago

OMG :D fuk it :)

Ozzy8
almost 16 years ago

do you like this?

[URL=http://imageshack.us][IMG]http://img57.imageshack.us/img57/3668/srdcejo6.png[/IMG][/URL]

Ozzy8
almost 16 years ago

do you like this?

Image Hosted by ImageShack.us

Ice
over 16 years ago

Magnificent!!
But a question:
Create the „atmosphere“: which selector do you use? I still have a lot of 'stripes' around the sphere, not the smooth green color like yours in the example?
Where did it go wrong?
And how can I create this in another color like blue?

JPEGJedi member for almost 17 years JPEGJedi 3 comments
almost 17 years ago

I figured it out, finally. I forgot to rotate the extra CCW...the polar coords dont work without it.
To Scerwup: The polar coords dont work bcuz they are polar, for spheres.

Scerwup member for almost 17 years Scerwup 1 comment
almost 17 years ago

I'm pretty new to gimp, but I saw this tutorial and really liked it, it allowed me to expirement with a bunch of things. I keep coming back to it for certain things. So, great tut in my opinion. I was wondering if anyone has any idea how to do this on a cube? I made the cube and put the renders and stuff on each side, but polar coords wont work with the cube, any ideas would be appreciated. Im posting one of the balls i made.

JPEGJedi member for almost 17 years JPEGJedi 3 comments
almost 17 years ago

I got something wrong in the road...great tutorial, tho

exn member for about 17 years exn 2 comments
about 17 years ago

Very nice tutorial !

afftar peshi ischo :)

mm.matus
about 17 years ago

Simple tutorial, but great outcome. I am waiting for some more :O)

Eduardo
over 17 years ago

Great Tutorial, good technique with polar conversions and nice texture.