RSS/Atom feed Twitter
Site is read-only, email is disabled

Tutorial: Exploding Planet
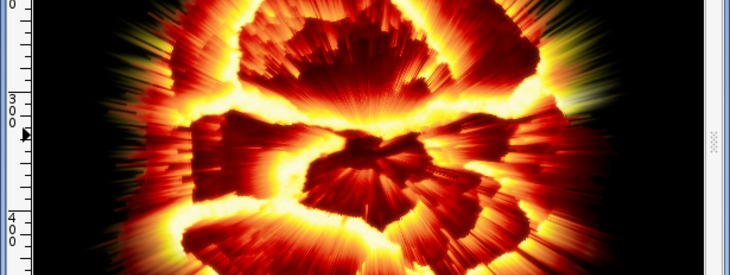
Written by , translated by Paraknight · Created on Dec 09, 2007, last updated about 14 years ago CC BY-NC License

Motivation

Various special effects are just there to get to know some techniques that you might need once. The result of this tutorial will probably not be further used, but it still looks cool ;)

Tutorial details

  1. 1

    Like some others, this tutorial is an implementation of an existing Photoshop tutorial.

    Create a new image (700px * 700px) with a black background colour.

  2. 2

    Download the attachment to this tutorial (right), open the JPG and copy the cracked soil (ctrl+c) into your new GIMP-File onto a new layer. Press CRTL+T to transform and type in 700×700 pixels. Now move the layer into the middle, so that everything can be seen.

    Optional: To achieve an exact positioning, you can also use the alignment tool. Click the tool, click on the layer with the cracked soil. Now go to: “Relative to:”. Then click the icon for the horizontal and vertical middle each once – your layer should now exactly fit in the size of the image!

  3. 3

    Now, stretch the active layer on a ball: Go to Filters / Map / Map object and select “sphere”. See the settings in the picture below. In the “light” tab select: No light.

  4. 4

    Invert the colors (Color / Invert). You will get a blue and white sphere:

  5. 5

    We will now add the exploding rays. For this we first need the sphere streched on the layer: Filters / Distorts / Polar coords. Disable the bottom-right checkbox “To Polar”. Click OK.

    Then go to Image / Transform / Rotate 90° CW.

  6. 6

    Click Filters / Distorts / Wind with the values:

    Wind
    Direction: Right
    Edge affected: Leading
    Threshold: 5
    Strength: 37

    Use the filter again by pressing CTRL+F.

  7. 7

    Now we must undo the stretching from before to get our sphere:

    - Turn the Layer by selecting Layer / Transform / 90° CCW. It should now be on the top side.
    - Now select Filters / Distorts / Polar coords. Check the box for “To Polar” again.

  8. 8

    Then it looks quite cool. Take the Select Eliptical Regions tool (Key E) make a selction around the planet – invert this and cut the white edge away.

    After that go to Select / None to make the existin selection dissappear.

    Press CRTL+B to make the tool window appear – then L to activate the Gradient tool. Search for the gradient seen on the picture.

  9. 9

    Turn it around and go to Colors / Map / Gradient Map and you have your exploding planet!

    Optionally, you could duplicate the planet layer. Soften this layer with the value 11, turn the transparency of the layer to 65% and change the layer mode to “screen” or “color”. Thus, it reached a little more color intensity and softer transitions. Have fun with it.

Comments

Post your own comments, questions or hints here. The author and other users will see your posting and can reply to it.

Of course, you can also ask in the chat.

Subscription management

Please log in to manage your subscriptions.

User rating

This topic (Exploding Planet) has been rated 4.7/5.0.

New comments are disabled because of spam.

scarfish
over 12 years ago

I guess the other commenters are smarter than me. It took me a few minutes to realize on step 9 you just meant to reverse the gradient. Cool effect and process. Thank you.

Todo Gimp
over 13 years ago

Hi devvv

I've created a spanish version of you tut
http://www.todogimp.com/?q=general/explosion-de-un-planeta

Thanks

hanxiong
almost 14 years ago

Mine is here:

http://hanciong.deviantart.com/#/d3aycjv

hanxiong
almost 14 years ago

Why don't you use Filters -> Light and Shadow -> Apply Lens in step 3? I think the result is more realistic that way.

ghornicule rated this topic with 5/5
over 14 years ago

I just think gimp is fantastic all the way around.Your work is incredible.

bananalover rated this topic with 4/5
over 14 years ago

mine looks pretty cool, but i dont get the yellow flare in the cracks of the planet... any ideas why?

Someguy rated this topic with 5/5
over 14 years ago

I found something cool.
Do not use the given image, instead create a new layer, it should have equal width and height.

Fill this with the pattern 'Dried Mud.'
Follow the tutorial, but DO NOT INVERT COLORS EVER.

You'll get a cool looking Sun. Enjoy~

Shelby
over 15 years ago

oh and that soften with value 11 thing I figured was a gaussian blur. i feel stupid now xD

Shelby
over 15 years ago

oh and that soften with value 11 thing I figured was a gaussian blur. i feel stupid now xD

Shelby
over 15 years ago

I figured it out, when you do the coloring with color/map/gradient map you have to have the blend mode on burn not normal. at least thats what I did to get it to look darker. Before my planet was too bright and didnt look quite right.

Shelby
over 15 years ago

At the end where it says:

"Optionally, you could duplicate the planet layer. Soften this layer with the value 11, turn the transparency of the layer to 65% and change the layer mode to "screen" or "color". Thus, it reached a little more color intensity and softer transitions. Have fun with it."

How do you soften the layer with the value 11?

Darlingpresley member for over 15 years Darlingpresley 9 comments
over 15 years ago

woaaahhhhhhh love it :)

Breil
over 15 years ago

Mine's not a sphere,instead it's a chunky planet and I do this in GIMP v. 2.6.6(the 2008 version)

xandercm member for almost 16 years xandercm 1 comment
almost 16 years ago

Great tutorial! I combined this with the Star field tutorial and modified the planet to a mirrorball.

RikarduJ
almost 16 years ago

Hm...in step 2 i press Ctrl+T and i can't do anything that says and i even search for gimp tools for it (im a begginer)
Please help me!

FELIXnx01
about 16 years ago

Thank you very much. This is the first tutorial I posted for a forum and there where some problems because I haven't posted the credits. I'm going to insert the autothor's name and the link to this tutorial. The URL of the translated tutorial is this:
http://gimpworld.forumfree.net/?t=35345596&st=0#entry291808448
The Tutorial is an image but don't worry, there's a link to the homepage of this site.
Thank you very much. If there are some problems please write and I'll do my possible.
"Long life and prosper!"

redforce member for over 18 years redforce 230 comments
about 16 years ago

FELIXnx01, of course, please just mention the author's name (devvv) and a link to this page, according to the license. If you tell us the URL of the translated tutorial, I will add it to the "Available in other languages" list.

FELIXnx01
about 16 years ago

Can I translate this tutorial for an italian gimp based forum?

Rafi member for over 16 years Rafi 1 comment
over 16 years ago

Nice tut........keep em commin

Zeratul554 member for over 16 years Zeratul554 1 comment
over 16 years ago

i loved this tutorial and used it on my homepage i also used a bluish gradient it looks real cool

amy
over 16 years ago

"Filters / Distorts / Polar coords. Disable the bottom-right checkbox "To Polar". Click OK."

this box was already checked for me but i tried it anyway and when i clicked ok it just gave me a weird curved semi circle

matt
almost 17 years ago

How do you soften in gimp 2.2

paulseph
almost 17 years ago

but other than that this rocks, im very pleased with the result thanks :)

paulseph
almost 17 years ago

similar to lolzlolz below

paulseph
almost 17 years ago

I found that that last invert on step 8 is not necessary, in fact the result of that made it look like a weird dark red cracked ball w/o the exploding effect.

devvv member for over 18 years devvv 1475 comments
almost 17 years ago

i've corrected it! thanks. gradient map is found in the base colors menu not in filters / colors.

Colors / Map / Map gradient

Arbiter
almost 17 years ago

With the last step. There is no Map gradient option in gimp 2.4
What do you think could replace it.

Ztoph member for almost 17 years Ztoph 4 comments
almost 17 years ago

Can U do this on a human, or another object??

anuja
almost 17 years ago

simple and very realistic effet.

devvv member for over 18 years devvv 1475 comments
about 17 years ago

it was an error, i corrected it already ;) thanks!

lolzlolz
about 17 years ago

no its supposed to go right i think
maybe not

Koantig member for about 17 years Koantig 1 comment
about 17 years ago

Cool stuff. In step 6, the direction of the wind should be 'right' not 'left' though.

devvv member for over 18 years devvv 1475 comments
about 17 years ago

the image needs to be square, and in step 2 make sure the layer that contains the soil is also exactly square. you can try Layer / Layer to image size.

Mike
about 17 years ago

My mapping comes out ovalish... not a cirlce.

lexor
about 17 years ago

he didn't make it, he found it online lol

backdrop001
about 17 years ago

I'd actually would like to know how to make that soil pic you had us download, that would be perfect for something i'm trying to make in gimp, is there a tutorial for that?

lolzlolz member for about 17 years lolzlolz 2 comments
about 17 years ago

nvm working now

lolzlolz member for about 17 years lolzlolz 2 comments
about 17 years ago

there's no gradient that matches that color, so i have a weird result that doesn't have the same color,
any ideas?
thanks

Justine
about 17 years ago

How to make the screen black?? lols

LukasT
about 17 years ago

I just love this site :) Cool tutorial

redforce member for over 18 years redforce 230 comments
about 17 years ago

Thanks to Paraknight for translating this tutorial from German to English!