RSS/Atom feed Twitter
Site is read-only, email is disabled

Tutorial: Create a cool wax seal with an engraved eagle
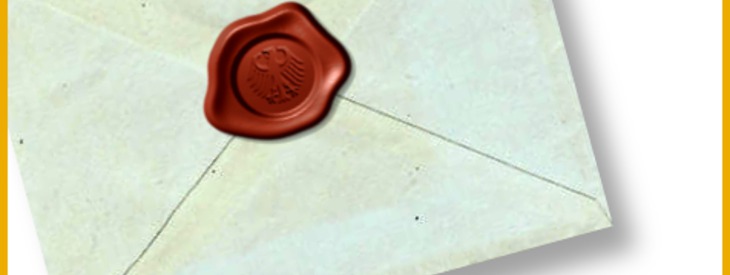
Written by , translated by devvv · Created on Dec 15, 2009, last updated almost 14 years ago CC BY-NC License
Create a cool wax seal with an engraved eagle

Motivation

You maybe know this: In the very past important letters have been sealed using a so called wax seal. This is a hot wax drop on the opening of the envelope - then a seal ring containing the unique emblem of the empire was pressed on the wax to harden the wax. So the letter was secured from spys from now on - because any opening would have breached the original letter. This tutorial shows how to create such a wax seal in GIMP! Have fun ;)

Tutorial details

  1. 1

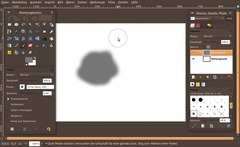
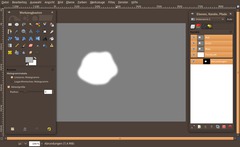
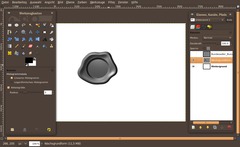
    We’re starting with the base form of the wax drop. It must not ne an exact round circle.

    - Open a new empty image: 640×480px.
    - Set the foreground color to #777777 (it is a middle gray tone)
    - Create a new, transparent layer
    - paint an area like shown in the picture below using the brush tool (use a soft 19px-brush and scale it to 5)

  2. 2

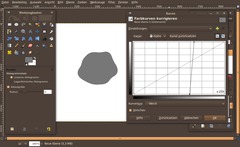
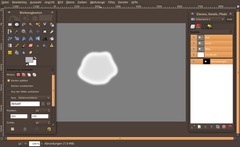
    Next we want to get rid of the semi transparent parts of the “wax drop”.

    - Colors / Curves

    Set the channel to Alpha and move the points to the center as shown in the image below.

  3. 3

    Now we’re finished with the base form of the wax. The next few steps show the realisation of the glossyness of the wax. The difficult part on this is that we need a soft rounding on the outer side of the wax, while we need a harder one inside which represents the mark/cast of the seal ring.
    Have a short look at the result image to see what i mean.

    To realize such complex roundings we gonna use a depth channel (this shows our wax drop how “deep” the roundings should be on a specific place).

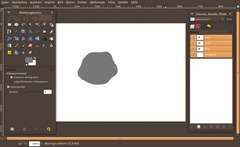
    - right click the mouse button on the layers dialog of the wax layer: choose “Selection from Alpha”.
    - click the eye symbol to make the wax disappear temorarily (we enable it again at a later time).

    - open up the Channels dialog: Windows / Dockable Dialogs / Channels

  4. 4

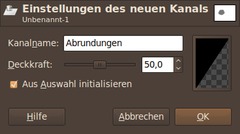
    Click “Initialize from Selection”. Name the channel “Depth”.

  5. 5

    - Selection / None

    Now we’ve a BLACK/WHITE layer. The purpose of a channel in this kind of picture manipulation is to show a layer what specific roundings the object (in our case the wax drop) shall receive using the Lighning effects filter later on.

    Lets start with the outer roundings/depth. Use the Gaussian Blur filter to change the hard crossing from black/white to some gray tones which represent smooth roundings.

    - Filter / Blur / Gaussian Blur: 9px. Repeat the step using CTRL+SHIFT+F with 6px, 3px and finally 1px. This gives us a very smooth fading.

  6. 6

    Change to the layers dialog for a second and choose “Selection from Alpha” again from the context menu of the wax layer.

    With the selection active change back to the channels dialog. Click the channel we’re working to activate it.

    - Select / Shrink: 15px
    - Select / Fade: 25px
    - Choose #bababa as new foreground color.
    - Edit / Fill FG color (or just press CTRL+, on your keyborad)
    - Select / None

    This slight coloring will make the wax itself be a little more anomalous.

  7. 7

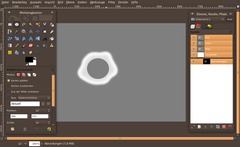
    Now we get to the part of the pressed ring.

    - Choose the Elliptical/Circle Selection tool
    - Drag a circle inside the wax on the channel.
    - Press D to reset to base colors (black/white).
    - Press CTRL+, to fill the selection with black (actually it is a gray tone, because we’ve told the channel to be 50% transparent when creating it. So a full black fill becomes a 50% black which means a middle gray)
    - Select / None.

  8. 8

    - Filter / Blur / Gaussian Blur: 4px.

  9. 9

    - Make the channel invisible now (click the eye icon next to the channel in the channels dialog)
    - change to the layers dialog. Make the wax layer visible again.

    - Filter / Light & Shadow / Lightning Effects
    - Move the little blue dot in the preview window to the top left of the wax area.
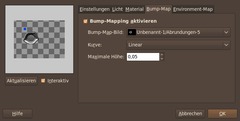
    - In the Bump-Map tab use the depth channel set the maximum height to 0.05.

  10. 10

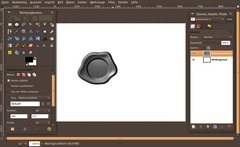
    After clicking OK the wax looks pretty cool already ;)

  11. 11

    Now we’re getting a step futher to the engraved eagle.

    There is Germanys federal eagle available on wikipdeia commons here as vector graphics: http://de.wikipedia.org/wiki/Datei:Bundesadler_Bundesorgane.svg

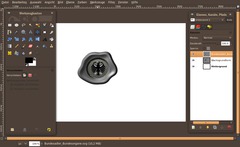
    Move the eagle image into your open image. GIMP asks you what size the eagle shall be. Choose: i.e. 75×70px. Then the eagle should appear in the desired size. Move it to the right direction inside the wax circle.

  12. 12

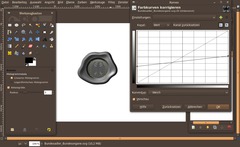
    Now we’ve to convert the black and white in the eagle image to some gray tones – that is because the Bump-Map filter needs gray tones to determine the depth of the engravness of the eagle inside the wax. To change colors use the curves:

    - Colors / Curves: Read the values from the image.

  13. 13

    - Important: Layer / Layer to Image size! If you skip this the Bump map filter will fail to allocate the right position of the eagle engraving and it will not even show you the eagle as an available bump map to choose.

    - Make the layer containing the eagle invisible using the eye icon.

  14. 14

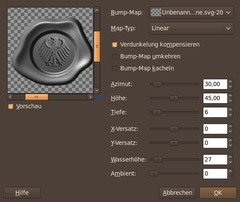
    - Filter / Map / Bump map:

    Choose the egale layer from the drop down menu and use the values from the image below:

  15. 15

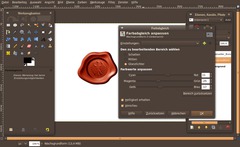
    To finish the image we need to colorize the wax using a saturate red waxy color ;)

    - Colors / Color Balance:

    Shadows: 17 / -22 / -52
    Midtones: 50 / -14 / -30
    Highlights: 11 / -25 / -17

    Darken it afterwards using Brightness & Contrast or the Curves again!

  16. 16

    We’re done ;) I’m curious what you will engrave into the wax, heh…

Comments

Post your own comments, questions or hints here. The author and other users will see your posting and can reply to it.

Of course, you can also ask in the chat.

Subscription management

Please log in to manage your subscriptions.

User rating

This topic (Create a cool wax seal with an engraved eagle) has been rated 4.5/5.0.

New comments are disabled because of spam.

Julio Garay
almost 9 years ago

This tutorial is S-U-P-E-R-B. I'm speechless. Thank you, I was looking just for this!!!

devvv member for about 18 years devvv 1475 comments
about 10 years ago

The layer you apply the bump map on needs to have the exact! same size as the bump map. to ensure this go to layers / layer to image size! then the filter should show the bump map.

Erin
about 10 years ago

Hi, I cannot seem to get the lighting effects to show up. If I choose it to create a new image, then it shows up, but otherwise it does not do anything. I still have the gray wax base. I have absolutely no idea what to do... Thanks for any help.

Nathan
almost 12 years ago

Thanks for this tutorial! I used it in a job designing a certificate template for CCPED's free online TEFL course ( you can see the website at http://ccped.org/free-tefl-course-description/ )
Much appreciated!

devvv member for about 18 years devvv 1475 comments
about 12 years ago

To apply a channel to a layer the layer needs to have the same "size" as the channel. Select the layer you want to apply the bumpmap and go to Layer / Layer to Image size. Then it will show up in the bump map tab. Hoe that helps!

Oz
about 12 years ago

No answer as to why the depth channel doesn't show up after step 9? Really needs clarification as I think you must be missing a step. After applying lighting, the center "stamp" circle (would be from a ring) is not showing up like in your pic.

fordprobes.com
about 12 years ago

It has to be very interesting session. I would like to learn more about how designers in the User Experience space approach wireframes.

ruroino
almost 13 years ago

STUCK ON STEP 9? Here is an explanation of what's wrong if you're still not getting the pressed circle:

When you enter the lighting effect menu,on the "bump-map" tab, look at the drop down menu called, "Bumpmap image." Make sure the image selected there is the "Depth" layer.

devvv member for about 18 years devvv 1475 comments
about 13 years ago

At wich step are you stuck? What parts of the tutorial would need more specific details?

Missty member for about 13 years Missty 1 comment
about 13 years ago

I am very new to Gimp, and I am in need to learn how to make a wax seal. Is there anyway you can explain the steps, more in being "Gimp for Dummies", as I feel I am one? Can you explain the steps in a more simpler terms, like in layman terms, so that I can understand? Thank you.

devvv member for about 18 years devvv 1475 comments
over 13 years ago

this error is mostly caused by uneven layer-sizes. use "layer" -> "layer to image size". the layer you want to use a channel on _must_ have the same size.

stuck on 4
over 13 years ago

I'm not sure what I'm missing, but on step 5 when I add a new channel the seal doesn't show like in the example, so I can't do any further steps...

TheRainsAreHere
over 13 years ago

How do people get it in the image in step 11. It has an ugly white border whenever I try.

Demon-Absol
almost 14 years ago

http://www.deviantart.com/download/198099737/bio_hazard_wax_stamp_by_demon_absol-d39xyqh.png some parts were hard to find out wat u meant but afterwards it was pretty simple :P the link is my wax stamp :P

devvv member for about 18 years devvv 1475 comments
almost 14 years ago

you have to click the wax layer in the layers dialogue to make it active. clickting the eye symbol isnt enough.

Jana
almost 14 years ago

Hellou. Thx for tutorial but I don't understand step 9. I don't have a circle in the middle of wax layer. In the channels I have it, but when I do my channel invisible and then I do visible my wax layer, it doesn't work, and I don't know why. I do the steps again, but still not working. Thx for help.

dstudio101
almost 14 years ago

step #14 nothing is showing (of the eagle) after a bump map -- do I need to make the layer visible again?

photocomix member for almost 18 years photocomix 25 comments rated this topic with 5/5
about 14 years ago

i see you used the lighting effect filter, but is very hard to use because has a microscopic preview.

i did a simple hack to multiply the plugin preview size
http://www.registry.gimp.org/node/24871

the code is on the link but for build win or even linux binary i badly need help

Zac
about 14 years ago

Nevermind, fixed it.

Zac
about 14 years ago

Didn't work for me. I did the lighting effects thing and it didn't turn out the way yours did. Also, I don't have a 'fade' tool. Did you mean feather? Anyways, I'll just go find a working tutorial.

Akr
about 14 years ago

Thanks a lot. Well laid out and nice tutorial. Easy to follow even for a beginner like me. :-)

-Akr

Akr
about 14 years ago

Eve,

Go to 'Layers' dialog and click on the wax-seal layer to select it, and then try selecting the lighting effect tool.

Akr

Eve member for over 15 years Eve 1 comment
about 14 years ago

When I began to work on it a little later the lightning worked but then I didn't go on with that tutorial. Now I'm doing the 'turning others into a stone statue'.... :) tutorial, very interesting. But I will make the wax seal later as well. Hope I will succeed. Thanks for your help.
Eve

mahvin
about 14 years ago

Ooops, my bad, wrong procedure for that step...

Eve, did you make the depth channel invisible, and highlight the wax seal layer in the layers dialog? I can't duplicate your problem.

mahvin
about 14 years ago

@Eve: Did you make the new added layer same as image size? Right click layer, Layer to Image Size.

Eve
about 14 years ago

Hi everyone,
I am at step 9 and my problem is that the lightning effects tool is disabled. Don't understand why?
Thanks so much.
Eve

pratt rated this topic with 5/5
about 14 years ago

Can you help me? I'm stuck at the last step. How do you incorporate image into the seal? I opened image as 'open as layers"... but in the end can't when I make the "image" invisible, its color doesn't change like the seal. In addition I also cant get rid of the border of image. any suggestions?

Dragonlord666 member for over 14 years Dragonlord666 3 comments
over 14 years ago

I can answer my own question:
the image was a floating selection - I converted that to a new layer then converted the layers to RGB, then I could do the colours>Coour balance bit (step 15)

all done now - woohoo

Thanks

Dragonlord666 member for over 14 years Dragonlord666 3 comments
over 14 years ago

well I'm new to gimp and following different tuts online to see how I do LOL
just joined this forum so hope to learn a few bits here & there

OK, so I've followed this tut so far (with a little web surfing to find out I needed to add a new channel in step 4 as I could NOT find the "initialize from selection" )
but I am stuck on the final step (15) we need to colourise the wax
I cannot select the wax layer without loosing the image
if I apply the directions as it reads I only colour the image red
have no idea what I'm doing wrong so any help would be great

apart from that I have a very nice grey wax seal LOL

devvv member for about 18 years devvv 1475 comments
over 14 years ago

vira, it seems that there is something wrong with your bump-map. did you choose the correct channel in the Bumpmap tab inside the lighting effects filter?

vira
over 14 years ago

I wonder if anyone ever read these comments...:( I need some help! I do great up until steps 8 and 9. I do not know what i am doing wrong especially since i follow the steps exactly as directed. After i do step 9, this is what i get:
obviously nothing like what the pic in the tut looks like. any help please?

TheIrisKriss member for over 14 years TheIrisKriss 1 comment rated this topic with 5/5
over 14 years ago

Will, you'll want to use the feather option under the select menu it does the same thing.

I made a wax seal for the Clan Cameron :]

vira rated this topic with 4/5
over 14 years ago

on step 9 Make the channel invisible now (click the eye icon next to the channel in the channels dialog)
- change to the layers dialog. Make the wax layer visible again. well i followed the steps exactly and finally clicked ok but i get nothing but a black blob with some effects, what am i doing wrong> ug :(

Will
over 14 years ago

I can't seem to find Select / Fade on my GUI, there's no Fade option under the Select drop menu. Anyone know where i might find that?

Thanks in advance

Ally
over 14 years ago

I got the Color>Curves right now! I didn't listen carefully. You should actually make the channel Alpha.

Ally rated this topic with 3/5
over 14 years ago

Umm... I'm done with the seal. Can you also make a tutorial for the letter? Thanks!

Cadaver
over 14 years ago

After part 2, when I have to use the curve option, rather than Gettting an image that looks like the image, I get the same product as before, but with a black hue. Please help?

Julio rated this topic with 5/5
over 14 years ago

Sorry, I finally got it to work. I should jump a building for not been more aware.

Julio
over 14 years ago

OK, I'm not getting the results well. When I make the circle and you say that then you need to make the Depth channel invisible and the wax layer visible, nothing i made in the Depth channel translates to the layer. I verified that the channel is made from the selection, everything stays the same. I'm doing the tutorial exactly as is stated here but is not working at all.

devvv member for about 18 years devvv 1475 comments
almost 15 years ago

Hello Jose! I've clarified step 7 a bit more now. All i meant was, that, when creating a channel with 50% transparency, and if you then fill the channel with total black it is actually not a black but a gray (50% transparent black becomes gray)

Hope that helps!

Jose (Coche)
almost 15 years ago

Thanks devv! Really nice tutorial!!
I don't get the point in step 7, it says "because we've told the channel to be 50% overlay"... I think I've lost myself in the road, but can anybody explain me how this works.

Rob
almost 15 years ago

A little hard to follow in places due to the wording and slight variations in the GUI, but the end result is excellent. Thank you.

PixelOz
almost 15 years ago

Terrific1 I love it! Nice tutorial.

devvv member for about 18 years devvv 1475 comments
almost 15 years ago

most likely you painted the "wax" on the background layer. you need to paint it on a transparent newly created layer. otherwise there will be no option for Alpha in the dropdown menu of the curves dialog.

mahvin
almost 15 years ago

@Camilla, are you sure you created a new transparent layer in step 1? If not, try doing that, first. If you did create a transparent layer then it means you are most likely working on the background layer and not the transparent layer.

Camilla
almost 15 years ago

I can't select the Alpha channel in step 2...Can anyone tell me how to make it work? It's just grayed out.

mahvin
almost 15 years ago

Excellent tutorial, thanks Bernhard!

Jose
almost 15 years ago

The final result is pretty cool!

Wes
almost 15 years ago

Ok, I'm an idiot, if I just follow the "Color, Curves" part of it, it works out fine. Sorry.

Wes
almost 15 years ago

Step 2 needs more detail. It took me a while to figure out you were in the histogram window (Sorry, I don't know German), and mine doesn't look like the picture. I can't seem to get the settings to do what you're doing.