RSS/Atom feed Twitter
Site is read-only, email is disabled

Tutorial: Masking hair with fine strands

Written by , translated by redforce · Created on Nov 23, 2008, last updated about 14 years ago CC BY-NC License

Motivation

There are many ways of masking objects with GIMP. This tutorials shows a way that produces good results for fine details like strands of hair, especially for portrait photos with a simple background.

Tutorial details

  1. 1

    This masking technique is good for strands of hair or to replace the sky.

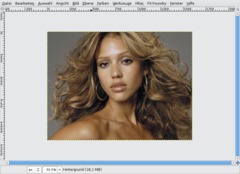
    On the image, you can see the fine hair strands and the mat gray background.

  2. 2

    Now we want to create a detailled layer mask that contains all fine details of the hair.

    To do so, we have to create a copy of the background layer first:

    Click on the “Duplicate layer” button in the layer dialog or press Ctrl+Shift+D.

  3. 3

    The next step is important: We reduce the layer’s color by disaturation. The best way to do so is using the channel mixer:

    - Colors / Components / Channel Mixer

  4. 4

    Now click on “Monochrome” so the image will become grayscaled.

  5. 5

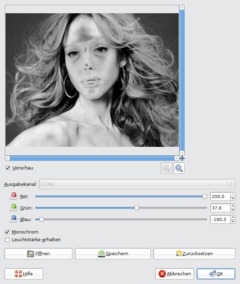
    You can see in the preview that the image doesn’t have colors anymore.

    Now it is important that we achieve a good contrast between the background and Jessica’s hair.

    For this you have to find out the individual settings for each image. There are no working generic settings. Pay special attention on the fine hair parts. Try to make them light gray while the background (here: gray) should become darker or stay at least the same. It doesn’t have to be perfect because in the next step, we’ll do some fine-tuning.

    The fine hair details should NOT blur with the background. It doesn’t matter if the image becomes granular or if the face looks strange (like on the screenshot). Only the HAIR matters.

    I have also amplified the red color tones (the hair contains many of them and become brighter) and reduced the blue tones so that in sum the background doesn’t become brighter. I slightly amplified the green part. The green channel often contains details and contrasts, so the hair is masked even better.

  6. 6

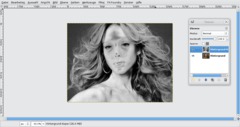
    Now my image looks like this:

  7. 7

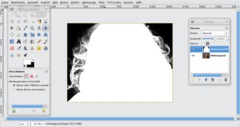
    Now we paint the parts that don’t need masking with white (the skin and the hair where’s no background).

    - Select the Paintbrush tool
    - Use a big brush size (relatively hard with some soft edge)
    - Choose foreground color: white
    - Make the parts white

    Hint: Choose a very hard brush for the region at the left bottom (shoulder skin). It’s often useful to combine different brushes.

    Then start painting the regions that don’t contain details revelant for masking. You can paint them roughly/quickly.

    Now my image looks like this:

  8. 8

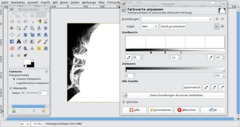
    Now we adjust the gray tones of the picture. For this it is important to make the background completely black while the hair should become (nearly) white. In the next step everything that is white will become visible and black regions will become transparent.

    Choose: – Colors / Levels

    In the dialog, you can find three moveable control triangles. The gradient from black to white represents the amount of different gray tones in the image. If you move the left control triangle towards the center, the amount of black will be reduced and become a dark grey. The right control works vice versa. The middle control is for fine-tuning. You can use it to make the remaining grey tones a bit brighter or darker.

    As you can see in the preview, the bright hair strands have become even brighter while the background has become darker.

  9. 9

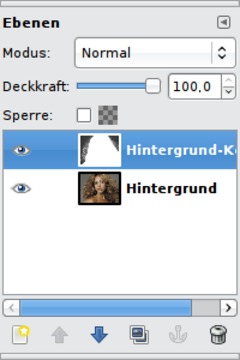
    We have a perfectly adjusted grayscale layer now that determines which regions become visible or transparent.

    Now we have to create a layer mask and copy the details from the grayscale layer to this mask.

  10. 10

    - Select / All (oder hit Ctrl+A)
    - Edit / Copy (or hit Strg+C)
    - activate background layer
    - Right-click into the layers dialog: “Add layer mask” (White)

  11. 11

    - Click on the small white area next to the background layer in the layer dialog to ensure that you’re working on the mask and not on the picture itself.

    - Edit / Paste (or Ctrl+V)

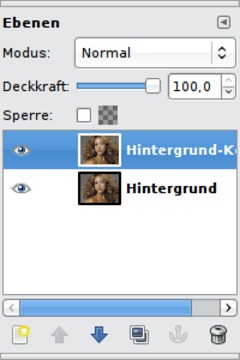
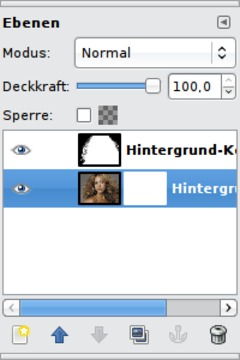
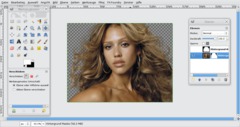
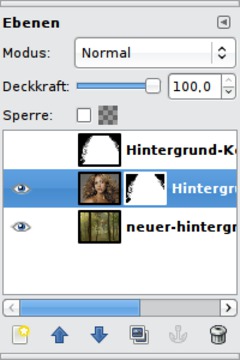
    Important: After that, the pasted layer is a floating selection. To fixate it on the layer, use the “Anchor” button of the layer dialog (at the bottom, 2nd from right). Your layers dialog should now look like this:

  12. 12

    Click on the eye symbol next to the grayscale layer above. Then the layer will disappear and the hair details should be visible on a transparent background.

  13. 13

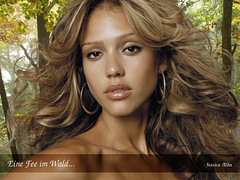
    At the end, we want to insert a new background and do some final adjustments.

    Save the “wood” background (you can find the download link at the beginning of the tutorial), choose File / Open as Layers and select the wood.

    It should be an own layer in the image now. In the layers dialog, move the wood layer to the bottom.

  14. 14

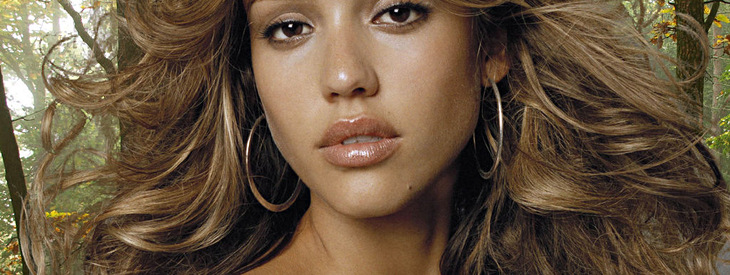
    Now it’s nearly perfect, but we can do even better (because when you zoom in, you can see some remaining gray of the original image background).

    We can improve this with some color adjustments again:

    - Select the layer mask
    - Colors / Levels

    The aim is to get the hair strands even darker (i.e. more transparent). So I move the left control to the center. You can see the results in the preview immediately.

    I hope you could learn something and it was fun for you.

    Ideas for more improvements:

    - On the layer mask, you could work with light/dark gray brushes to do some detailled corrections, for instance to remove regions that are not so beautiful.

    - Use the Smear tool to “melt” the foreground with the background in order to remove too hard transitions.

Comments

Post your own comments, questions or hints here. The author and other users will see your posting and can reply to it.

Of course, you can also ask in the chat.

Subscription management

Please log in to manage your subscriptions.

User rating

This topic (Masking hair with fine strands) has been rated 4.2/5.0.

New comments are disabled because of spam.

GreenElephant member for over 3 years GreenElephant 1 comment rated this topic with 4/5
over 3 years ago

Thanks. Gives me a different focus on how to tackle a problem I have with fluffy animals.

Dave Lopez
about 4 years ago

I would like to see how that fine hair is masked starting with your finished image. Rarely do I get images of people with a flat blank back ground. More often then not, the background is pretty close to the same values as the hair.

mehoraf member for over 8 years mehoraf 1 comment rated this topic with 3/5
almost 7 years ago

Thank you very much.

jhaynes
almost 7 years ago

i did fine till you said 'activate background layer' and i couldn't find via google search or search on gimp user manual search. so i had to stop and go back to utube , yuck, but successful finding big hair extract and replace bkgd replace to finish.

artur73 member for about 9 years artur73 1 comment rated this topic with 5/5
about 9 years ago

Hello, I've tried this tutorial with photos similar to the one used in this tutorial and worked fine with exception of photos where background is backlit - light spot blends into hair. Now I've got the problem with uneven bright background and fair hair portraits. Steps as presented above seem to not work :(
Could you please walk me through to successful asking hair with fine strands? Thank you in advance for your help.

devvv member for over 18 years devvv 1475 comments
over 9 years ago

if you have an image as in step 14 it is very hard to mask it. you need to manually paint the mask with different gray tones and different brush sizes.

dave
over 9 years ago

Its easy when there is a flat background. But what if your starting with the image in step 14 and want to mask the hair.

grateful user
about 10 years ago

cool tutorial, thanks mate

Erik
over 12 years ago

Hi again, Which one of your masking tutorials do you think is superior? I prefer the technique used in this one, for most images at least. Some I have to play around with a bit more.

What do you do when you have a bright background and some outher parts of the object are also bright?

In the picture used for this tutorial you already have sort of a contrast background.

Thanks

Erik
over 12 years ago

And I don't have the xcf-file sadly. Thanks to your tutorial I'm masking about 20 images/day or more. So when I'm satisifed with the result I just export them and delete the xcf.

Fortunately most objects I mask don't have a reflecting surface.

Erik
over 12 years ago

I'm satisfied with the result in the picture I linked you, for that image at least. Afterall it's just a product picture for a webshop and not something I'm going to submit to a digital art contest :P

However, it did require alot of steps, so If you could think of a way to deal with the reflecting problem that would be nice.

I don't like to use path tool, as it makes things look very rough and amature like.

In your other tutorial you get a slight white border around the person/object, which is nice - but when it get's into tight corners etc it overlaps. So I had to basicly, apply the first mask. Then start make that image greyscale and work with levels etc again, and then make another mask and apply to another layer of the original image, also had to do a bit more paintjob, but just corrections basicly.

devvv member for over 18 years devvv 1475 comments
over 12 years ago

mhm I see, did you try to use the path tool to make a selection around it by hand/manually (for this special case)?

Otherwise (if you want to get rid of that slight grey "shine" around the object you could do the following: get a selection of the mask, then shrink it by 2px or so, and then invert the selection so that the gray stuff you want to get rid of is selected. Use the Levels then and move the right triangle slightly to the left to get rid of the bright gray tones (in the levels you might need to select the alpha channel because [if you applied the mask already] that slight gray are semi-transparent pixels). if you want upload your xcf-file somewhere, since I don't exactly know in which "state" your masking is.

Erik
over 12 years ago

The main problem is that since the surface is "blank" - it picks up/reflects the colors inside the tent, thus making it really hard to seperate it from the background.

Here's the image (I can give you a higher res or brighter version if you want)

http://bildr.no/image/1209581.jpeg

Now here's a "rough" result, basicly using a mix between this guide and your other guide. Working with multiple layers and mask, using levels over and over again, inverting back and forth.. Since with your other guide you basicly get a white border around the object and I did not paint the background, but instead used levels. Sorry for wall of text..

Here's the result: http://bildr.no/image/1209579.jpeg

devvv member for over 18 years devvv 1475 comments
over 12 years ago

If you already have a single-color-background try to use "color to alpha" in the color menu. This will get you rid of the slight color surroundings on the object that has to be masked. If you want, just attach the image and I can take a closer look at it.

Erik
over 12 years ago

Any tips on how to mask blank objects?
I'm doing alot of masking of lamps,details,furnitures etc. Photo's are taken inside a photo-tent with a few different background colors available.

But whenever I have a picture of a blank object, such as silver etc, the blank surface takes up some of that background color - thus making it really hard to get a good contrast between object and background.

devvv member for over 18 years devvv 1475 comments
almost 13 years ago

Did you manage to create a nice white/black from the sky?

A Kong
almost 13 years ago

This works,up to a point. I used the image of a brunette, on a blue sky beach, and this technique did not remove the sky from between her curls, which showed up as soon as I added a non blue background. The woman was also wet, so around the edges, where her body met the mask, was more blue sky; the wet skin acts like a mirror on those curves.

It would be tedious to clean up the sky around the body, but the hair is too much.

Anyone have another technique?

Sigdrifa77 member for almost 13 years Sigdrifa77 1 comment rated this topic with 5/5
almost 13 years ago

Works great! Took some tweaks for my picture, though. I had a picture with darker hair and a lighter background. In the channel mixer it was impossible to get the background darker than the hair. So I made it lighter instead, and in step 7 masked with black instead of white. When I was done masking, I inverted the colors. Thanks a lot!

Awhiteman
about 13 years ago

Excellent Tutorial. Very well explained and superbly detailed- Thank you.

hannes
about 13 years ago

sorry again: Gimp RGGJAN Fork ;)

hannes
about 13 years ago

look at www.Partha.com. Here is a very good version (branch) of gimp to do this jop. ( video too) ;)

viny
about 13 years ago

hey yeah it's german^^ =)
so i think it's quite good but you can see many grey things between the hair and her face hope you understand it

IN DEUTSCH:
ich kannte diese Technik schon im Voraus, allerdings hilf diese nur bedingt bei einigen bildern wie hier ist es schwer die zwischenpikmente also zwischen den haaren undd em kopf herauszubekommen man sieht viele graue flächen und die rauszubekommen ist entweder richtig zeitaufwendin (und sieht dazu noch meistens nicht so gut aus) und andererseits oftmals mit unschönen kanten verbunden! keine ahnung wie lage die profisan so einem ausschnitt sitzen müssen um das richtig gut hinzubekommen (photopshop!?--> mag ich aber nicht xD)

ssaldkar
over 13 years ago

pictures in a diffrent language

Morten
almost 14 years ago

Very nice tutorial, mate

hannes61 member for about 14 years hannes61 11 comments
about 14 years ago

Thank you this tut is very good and understandable written.

krishnan rated this topic with 4/5
over 14 years ago

Very useful tutorial. I welcome like this more.

moggins rated this topic with 5/5
over 14 years ago

all the other tutorials for masking in gimp are terrible, but this one explains it very well! :) keep up the good work!

Sam rated this topic with 4/5
over 14 years ago

I found the tutorial itself very good. The application was a little short of useful because one would need a gray/very dark background for any useful or effective images. These are hard to come by. BUT that being said, I think you did a very good job on this tutorial. I hope you make more, it was very easy for me to follow.

Thanks for your time and efforts.

devvv member for over 18 years devvv 1475 comments
almost 15 years ago

magnoliasouth: in some cases you need to invert colors to get the right things masked, so to answer your question: yes ;)

trees can be masked in the same way as shown above. iwould do it the same way. it depends on the photo itself though. the object must be shown against a relativley clear background. trees and a sky in the bg is a good start. try to light out the whites and blues in the sky into total white so that the tree is shown against (pretty alsmost) plain white.

hope i could help ;)

cheers,bernhard

magnoliasouth
almost 15 years ago

Thanks devv! This is really great and I appreciate any time anyone ever volunteers to do a tutorial. I can't stand ungrateful folks and just ignore the nasties here.

I do have a question though. Let's say I'm removing a sky. I cannot seem to get through your tutorial without needing to invert the colors. In any case, what is your suggestion for painting around trees? I can't seem to find a good solution for that.

clipping path rated this topic with 4/5
almost 15 years ago

Cool. Hope to learn a lot from you and good luck. this is very informative tutorial. :)

Türk rated this topic with 5/5
almost 15 years ago

thanks for the tutorial. its very helpfull

mahvin
almost 15 years ago

I agree with Roy. Don't get angry, just ask questions. I spend a great deal of my time helping beginners by explaining things in more detail, because I sometimes have trouble with the present instructions, myself. It's frustrating to experience a stall, however, the best solution to that would be to do as Roy suggests: "Ask questions."

Roy Stannard
almost 15 years ago

@tobreme
No teacher or tutorial can anticipate all questions or cover all possibilities on any topic. Impossible! So what to do? Ask questions, that's all. All good students do that if they are not sure about some point(s). Maybe you should try that.

tobreme rated this topic with 2/5
almost 15 years ago

If you do a tutorial then decide: am I going to give a step-by-step description, or am I going to assume the reader already has knowledge of this area? if
it's the former then cover every tedious step. If it's the latter then do as is done in this tutorial. I recommend you tell the reader which it is, to avoid disappointment and frustration on the part of those like myself who come to the whole masking funtionality with no prior knowledge. Thanks for your effort, but for me it fell short of what I expected.

rahoof rated this topic with 5/5
almost 15 years ago

hai

kestrel4 member for about 15 years kestrel4 1 comment
about 15 years ago

I came to this tutorial after several hours of GIMP self-learning on the basics and found it very good.

I am looking for tutorials on the more subtle stuff, getting the best out of a photograph, without it being obvious that it has been edited. Guidance, anyone?

Thanks

danish
about 15 years ago

good

khaled
over 15 years ago

i dont know >>>the name of these program

mahvin
over 15 years ago

Using the "Preserve Luminosity" setting along with the Monochrome setting on the Mixer takes out several later steps. Once an image is black and white, as preserving luminosity will create, your image is mask ready from that point.

kirl
over 15 years ago

Thank you for taking the time to put this down 'in print'. Very helpful!!!

diosanne
over 15 years ago

wow!..it's great,,thanks for that tutorial.. that is helpful for me to mask a picture like that....

Emily
almost 16 years ago

Wow... I've been looking for a good tutorial on how to render fine areas for weeks, and this is more helpful than I thought it would be(usually there's a lot of guess work with tuts). Very thoroughly explained-- thank you!

mamboze member for about 16 years mamboze 15 comments
almost 16 years ago

Thank you very much for a brilliant tutorial; would that other tutorials be as clear and concise as this one. I'm on a steep learning curve with GIMP but this helps big time. Thanks again.

Adianna
about 16 years ago

wow.. I've been looking for something like this for soooo long... problem is... the hair I have is platinum with black tips... I have it on a white BG .... how do I set the levels? I couldn't get anything but complete white or Black.

janrode member for about 16 years janrode 1 comment
about 16 years ago

Very well structured tutorial, as beginner I came to a good result in less than 30 minutes.

Saere
about 16 years ago

I found this tutorial when I first started using Gimp, and I'll admit I was rather lost. Now, a few weeks later, I've reread it and recognize how helpful it is. Thank you! I need to keep practicing of course, but now understand the basics. :)

Pete
about 16 years ago

Brilliant tutorial. Its comments like some above that stop people doing such great pieces of work. Ignore the idiots, because the rest of us appreciate it.

ellen
about 16 years ago

Hi, I am a gimp beginner and I found this excellent. You explained everything in a very straight forward way. The other people who left comments need to spend a little time learning about easier things like masks before they attempt the harder stuff like this. They seem to want the whole of gimp explained to you by them which is impossible to do. The best way to learn it to spend time with Gimp. Thank you so much for this information. I'm going to really enjoy messing around with this feature.

Tyler
about 16 years ago

Yeah not enough explanation behind things, far too many steps left out that took a while to figure out, then in a part you explained it wasn't nearly well done enough so I just gave up because I had no clue what I was doing. The rest were simple things that just took a long time to find, but the part with the greyscale just doesn't work out without you explaining it at all..

In tutorials you shouldn't just say "Okay make this white, okay add a transparent mask to this" etc etc. It should be "Make this white by doing this, now add a transparent mask to it. (You add transparent masks by doing this this and this)..

Simply not enough information.

Travelster member for over 16 years Travelster 1 comment
about 16 years ago

Leaves out explanation of too many steps for Gimp beginners.

devvv member for over 18 years devvv 1475 comments
about 16 years ago

Matt: yes, first take a big brush, paint skin and body very fast with a big brush-size. then take a smaller one to paint the parts that are nearer to the fine detail. only paint over the parts that should be totally visible in the end!

Matt
about 16 years ago

I'm lost after part 6. Part 7 just says "make it white". Well that's fine, but do I have to go through the image and tediously paint everything white while "staying inside the lines"?

Roger
about 16 years ago

Once you have your mask created and your background layer pasted beneath, right click the foreground image layer and click "Edit Layer Mask" and you can paint the mask with white and black to fine tune it. This is very nice to get the finishing touches because you can see the background and the foreground together.

ardie
about 16 years ago

wow!

Robert
about 16 years ago

Wow very impressive devv!! Thanks